Project 2b: Customized Element: Reflection, Refraction, and Translucency
In Project 2b, I explored creating custom shaders for translucent and transparent materials, focusing on organic objects. I isolated shader attributes, examined the impact of the Fresnel effect, and added variation within materials.
TECHNICAL COMPOSITING BLOG
2/7/20245 min read
Final Render
Responsible for All Aspects, except the Dragon model
Software / Maya, Nuke
Renderer / Arnold

Nuke Tree


Week 5
Update 1 02/06/2024


I'm still experimenting with the subsurface scattering of the dragon because the UV mapping is so distorted. It's taking me a while to find a suitable texture.
Next, I created a new layer in Maya and named it "FresnelMask". Fresnel refers to how light reflects at varying intensities based on the viewing angle. In Maya, I utilized the aiFacingRatio node to generate the Fresnel Mask. The facing ratio measures the angle between the surface normal and the direction towards the camera. When working with transmission materials, the facing ratio can adjust properties like transparency or refraction.
In this layer, I applied a SurfaceShader to the CG object and connected it to a ramp node. Since the 2D placement node in a shading network dictates the texture's position and orientation within UV space, I aimed to control the vertical positioning of the texture based on the surface's facing angle, rather than UV space. Hence, I removed the 2D texture from the Ramp and linked an aiFacingRatio shader to the V parameter of the UV Coords in the Ramp. Within the Ramp node, I set the interpolation to 'smooth' and used red and green colors to regulate the desired amount of refraction. Red represents a glass material, while green indicates subsurface scattering material.


To ensure consistent reflection on the surface of the CG object, I established another layer named 'Reflection'. Within this layer, I included the CG object, ground plane, key light, and GeoDome. Also, to prevent reflection on my SSS material post-compositing, I disabled the Specular Weight in both the SSS and Glass materials.


To emulate the feeling the light inside the CG object, I created a new layer named 'aiVolume'. And put the CG object and key light into the layer. And assign a lambert 2 to the CG object. Next, assign an aiStandardVolume in the checkerboard of Volume Shader. The aiStandardVolume is a physically-based volume shader. It provides independent control over volume density, scatter color, and transparent color.


First attempt to put all layers into Nuke to do compositing. However, certain settings were incorrect following the professor's review on Wednesday.
SSS Glass Fresnel Mask Reflection AiVolume
2024.02.06-The Nuke tree so far.
Update 3 02/11/2024


SSS Glass Fresnel Mask Reflection AiVolume Fracture noFracture
Update 2 02/09/2024
I'm refining the project 1 and keep testing around each layers of the dragon in order to get the better result.
2024.02.11 -The Nuke tree so far.


Amethyst Stone References
Week 6
Update 1 02/13/2024
The next step is creating a simulated caustic shadow for the CG object. In Maya, I create a new layer called 'FrnShadMask (FresnelShadowMask)' and follow the same steps as I did for the FresnelMask for the dragon itself. And then to create a shadow mask using only black and white colors. This entails assigning the ground plane an aiShadowMatte shader and giving the shadow color fully white. This results in a caustic-like appearance for the shadow, albeit in black and white. Utilizing this method enhances the flexibility of the post-composite process.
To achieve the caustic effect, create new layers and import the CG object, ground plane, and Key light (No dome light needed). I utilize a transmission material for the dragon in Maya. The shadow should have a color so I adjusted the scatter color with multiple tries with noise textures to generate the caustic appearance. Additionally, I modified the ground plane to be fully white and enhanced the intensity of the key light. This approach creates a heightened contrast in the caustic reflection, further emphasizing the desired effect.


volume noise
crater


Update 2 02/15/2024
In class, I learned a new method that offers greater flexibility in controlling the color and shape of caustic shadows. This involves assigning an aiShadowMatte shader to the ground plane and setting the shadow color to pure white. Additionally, adjusting the color of the Transmission channel of the Dragon model using either a regular ramp or a ramp with aiFacingRatio. It's important to note that the colors on the ramp should be complementary to those in the RGB space, such as Red to Cyan and Green to Magenta.


Increase the Key light samples to get rid of the noise.
02/27/2024 Trouble Shooting
When I tried to use Grade node to shrink down my FresnelShadowMask, I encountered an issue. While it effectively functions in the Alpha viewport, the effect remains unchanged when switched to RGB mode.


Change rgb to rgba
I encountered an issue when exporting the sequences. I noticed that the fractures were barely visible. Suspecting a color space issue, I exported the EXR raw files and re-imported them node by node from top to bottom to diagnose the problem. After investigation, I found that the issue stemmed from the Fresnel Mask. Although the color space settings in Maya appeared correct, I decided to use a gizmo to substitute the Fresnel Mask. This solution resolved the issue.


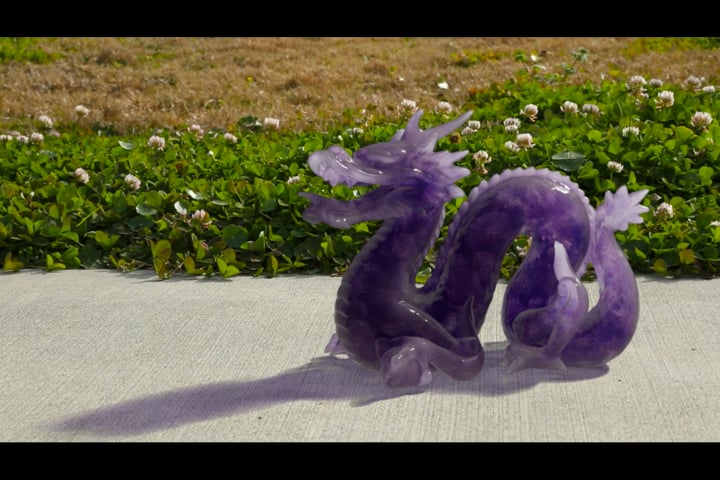
Before & After based on the feedback from the Professor and classmate
Old version
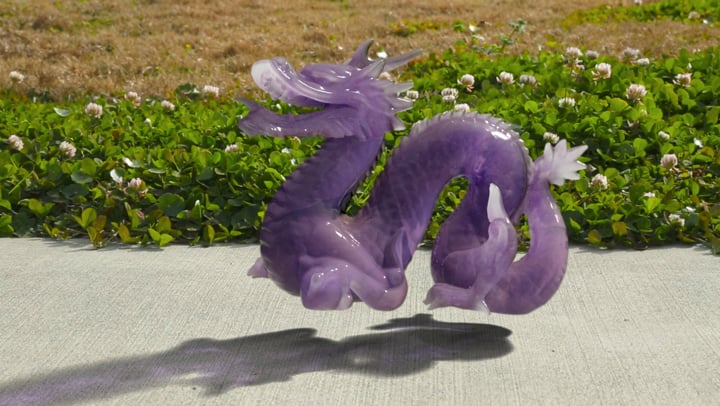
New Version
Added Fractures
Adjusted the Caustic Shadow
Added Dragon Ambient Occlusion
Fixed the contour line issue


Old Nuke Tree


New Nuke Tree
